

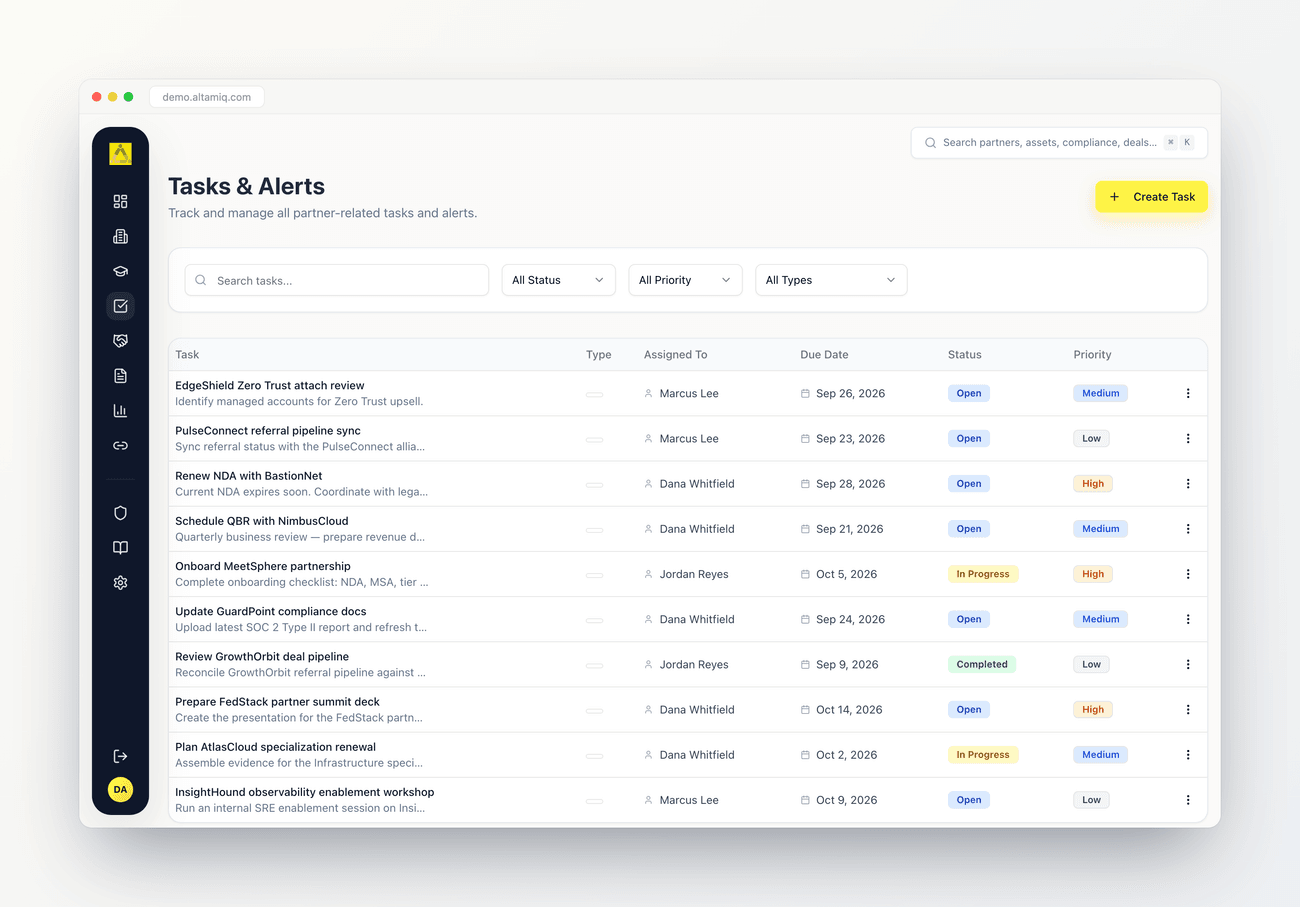
The Tasks & Alerts list, showing task priority, status, and the filter bar
What’s on the tasks list
Each row in the table gives you the key details at a glance.Task
The task title, an optional description, and the linked partner if there is one. This is where the “what” and “why” of the work lives.
Type
A colored badge showing the task category, such as Certification Renewal or Compliance Check.
Assigned To
The teammate responsible for the task.
Due Date
When the task is due. If the due date has passed and the task is not yet completed, you’ll see it turn red with an “Overdue” alert so it stands out.
Status
A badge showing where the task stands, from Open through to Completed.
Priority
A badge showing how urgent the task is, from Low up to Critical.
The “Overdue” alert only appears when a task’s due date is in the past and its status is anything other than Completed. Once you mark a task as Completed, the overdue warning goes away.
Creating and assigning a task
1
Open the create form
On the Tasks & Alerts page, click Create Task in the top-right corner. A dialog titled “Create New Task” opens.
2
Give the task a title
Type a clear Task Title. This is the one field you’ll always want to fill in, since it’s how the task shows up in the list and in search.
3
Add a description (optional)
Use the Description box to add any details, context, or next steps. This appears as a short line under the title in the table.
4
Choose a task type
Pick a Task Type to categorize the work. The default is General, and you can change it to any of the available categories.
5
Set the priority
Choose a Priority so your team knows how urgent the task is. It starts at Medium.
6
Assign it to someone
Enter the teammate’s name in Assigned To so it’s clear who owns the task.
7
Link a partner (optional)
Use the Related Partner dropdown to connect the task to a partner. See the next section for details.
8
Set a due date (optional)
Pick a Due Date using the date picker. Tasks with a past due date and a status that isn’t Completed are flagged as overdue.
9
Set the status
Choose a Status. New tasks default to Open, which is the right choice for most brand-new work.
10
Save
Click Save Task. Your new task appears at the top of the list right away.
Priority levels
Priority tells your team how urgently a task needs attention. AltamIQ offers four levels, each shown as its own colored badge in the list.Low
Routine work with no time pressure.
Medium
The default priority for a standard task.
High
Important work that should be handled soon.
Critical
Urgent work that needs immediate attention.
Status values
Status shows where a task is in its lifecycle. You can set any of the following when you create or edit a task.Linking a task to a partner
Connecting a task to a partner keeps your work tied to the right relationship, so you can see at a glance which partner a certification renewal or compliance check belongs to.1
Open the Related Partner dropdown
In the create or edit form, click the Related Partner dropdown.
2
Choose a partner
Select the partner from the list. The dropdown is populated from the partners already in your workspace.
3
Or leave it unlinked
If the task isn’t tied to a specific partner, choose No partner.
Finding tasks with search and filters
The filter bar at the top of the page helps you narrow a long list down to just what you care about. You can combine search with any of the filters, and they all work together.Search
Type in the Search tasks box to match on the task title, the person it’s assigned to, or the linked partner name.
Filter by status
Show only tasks in a chosen state, such as Open, In Progress, Completed, or On Hold.
Filter by priority
Focus on a single priority level, from Low through Critical, to surface your most urgent work.
Filter by type
Narrow the list to one category, such as Cert Renewal, Deal Registration, or Compliance.
Who can do what
What you can do on the Tasks & Alerts page depends on your role.Admin
Admin
Admins have full control. They can view every task, create new tasks, edit any task, and delete tasks. Deleting is an Admin-only action.
Manager
Manager
Managers can view every task, create new tasks, and edit any task. They cannot delete tasks, so the delete option won’t appear for them in the actions menu.
Viewer
Viewer
Viewers have read-only access. They can browse and open the tasks list, but they can’t create, edit, or delete tasks. The Create Task button and the row actions won’t be available.
If you expected to see the Create Task button or an Edit or Delete option and it isn’t there, it’s because your current role doesn’t include that permission. Ask an Admin on your team if you need more access.