> ## Documentation Index
> Fetch the complete documentation index at: https://docs.altamiq.com/llms.txt
> Use this file to discover all available pages before exploring further.
# Marketing Assets
> Upload, organize, search, filter, and share marketing collateral in the shared AltamIQ asset library, including file types, tags, partner and campaign links, and expiration dates.
The Marketing Assets library is your shared home for marketing collateral, presentations, and partner materials. From one screen you can upload files or external links, tag and categorize them, connect them to a partner or campaign, and let your whole team find and open them in seconds. This page walks you through everything you can do there.
 **Who can do what.** Admins can do everything here, including deleting assets. Managers can upload new assets and edit existing ones, but they cannot delete them. Viewers have read-only access: they can browse, search, filter, view, and download assets, but the Upload, Edit, and Delete controls won't appear for them.
## What you'll see
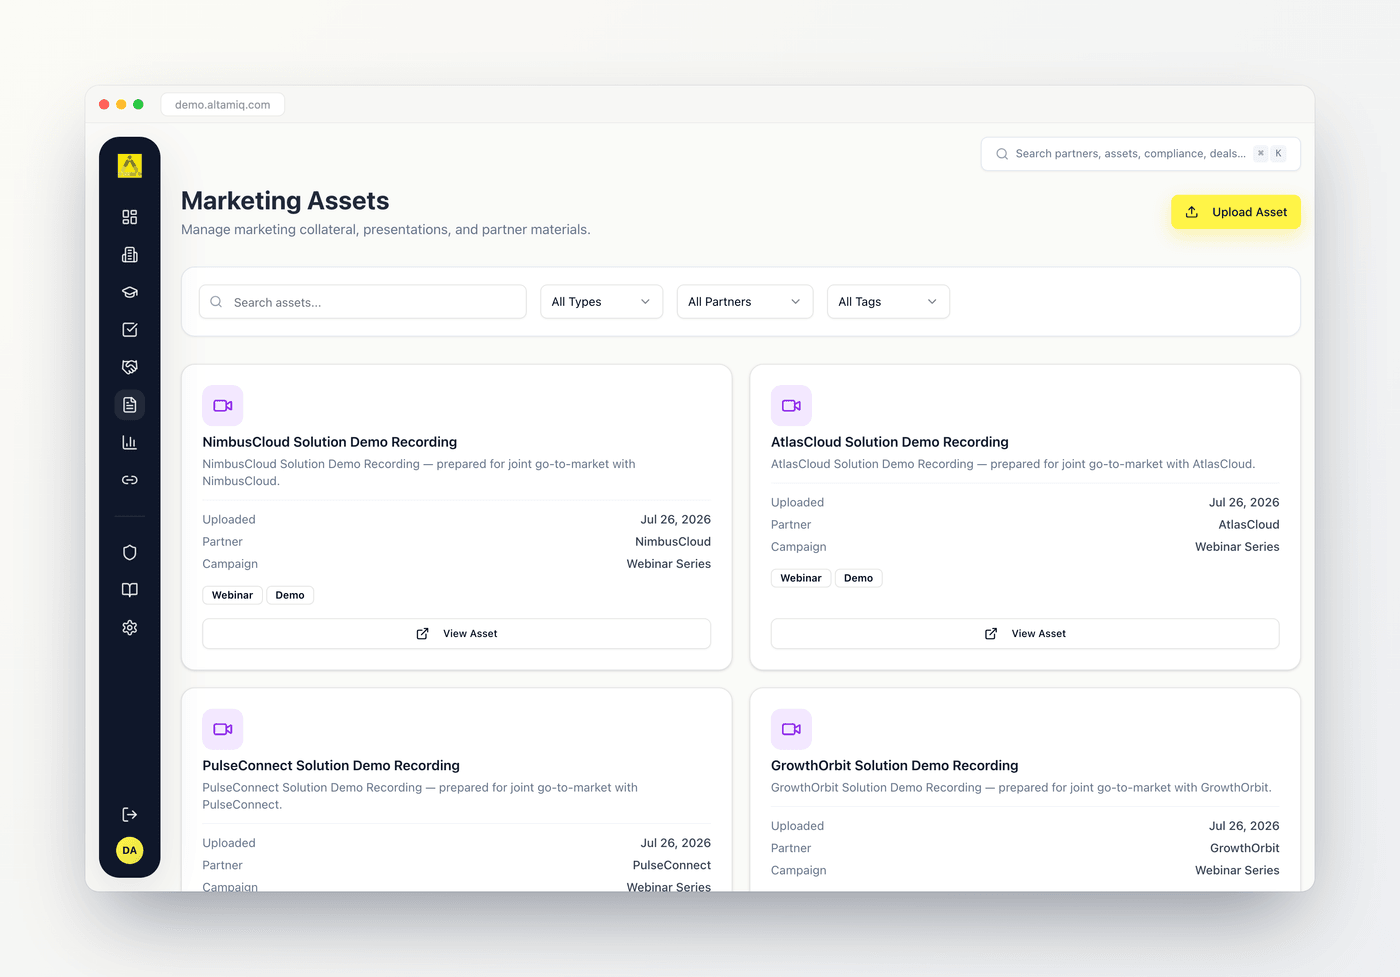
At the top of the page you'll find the title "Marketing Assets" with a short subtitle, and below it the search box and filters. The grid of asset cards fills the rest of the page.
Each asset appears as a card. A card shows:
A colored icon indicates the file type at a glance, and the asset title sits right beside it. Click the title to open the asset in a new tab.
An optional short description, shown under the title when one was added.
The upload date, the linked partner (or "Not linked" when none is set), and the campaign name when one was provided.
Any tags applied to the asset, shown as small pills so you can see its category quickly.
Every card also has a "View Asset" button pinned to the bottom (labeled "Open Link" for link-type assets) and a three-dot menu in the top corner for more actions.
## Upload an asset
If you're an Admin or Manager, you'll see an **Upload Asset** button in the top right. Use it to add a new file or an external link to the library.
**Who can do what.** Admins can do everything here, including deleting assets. Managers can upload new assets and edit existing ones, but they cannot delete them. Viewers have read-only access: they can browse, search, filter, view, and download assets, but the Upload, Edit, and Delete controls won't appear for them.
## What you'll see
At the top of the page you'll find the title "Marketing Assets" with a short subtitle, and below it the search box and filters. The grid of asset cards fills the rest of the page.
Each asset appears as a card. A card shows:
A colored icon indicates the file type at a glance, and the asset title sits right beside it. Click the title to open the asset in a new tab.
An optional short description, shown under the title when one was added.
The upload date, the linked partner (or "Not linked" when none is set), and the campaign name when one was provided.
Any tags applied to the asset, shown as small pills so you can see its category quickly.
Every card also has a "View Asset" button pinned to the bottom (labeled "Open Link" for link-type assets) and a three-dot menu in the top corner for more actions.
## Upload an asset
If you're an Admin or Manager, you'll see an **Upload Asset** button in the top right. Use it to add a new file or an external link to the library.
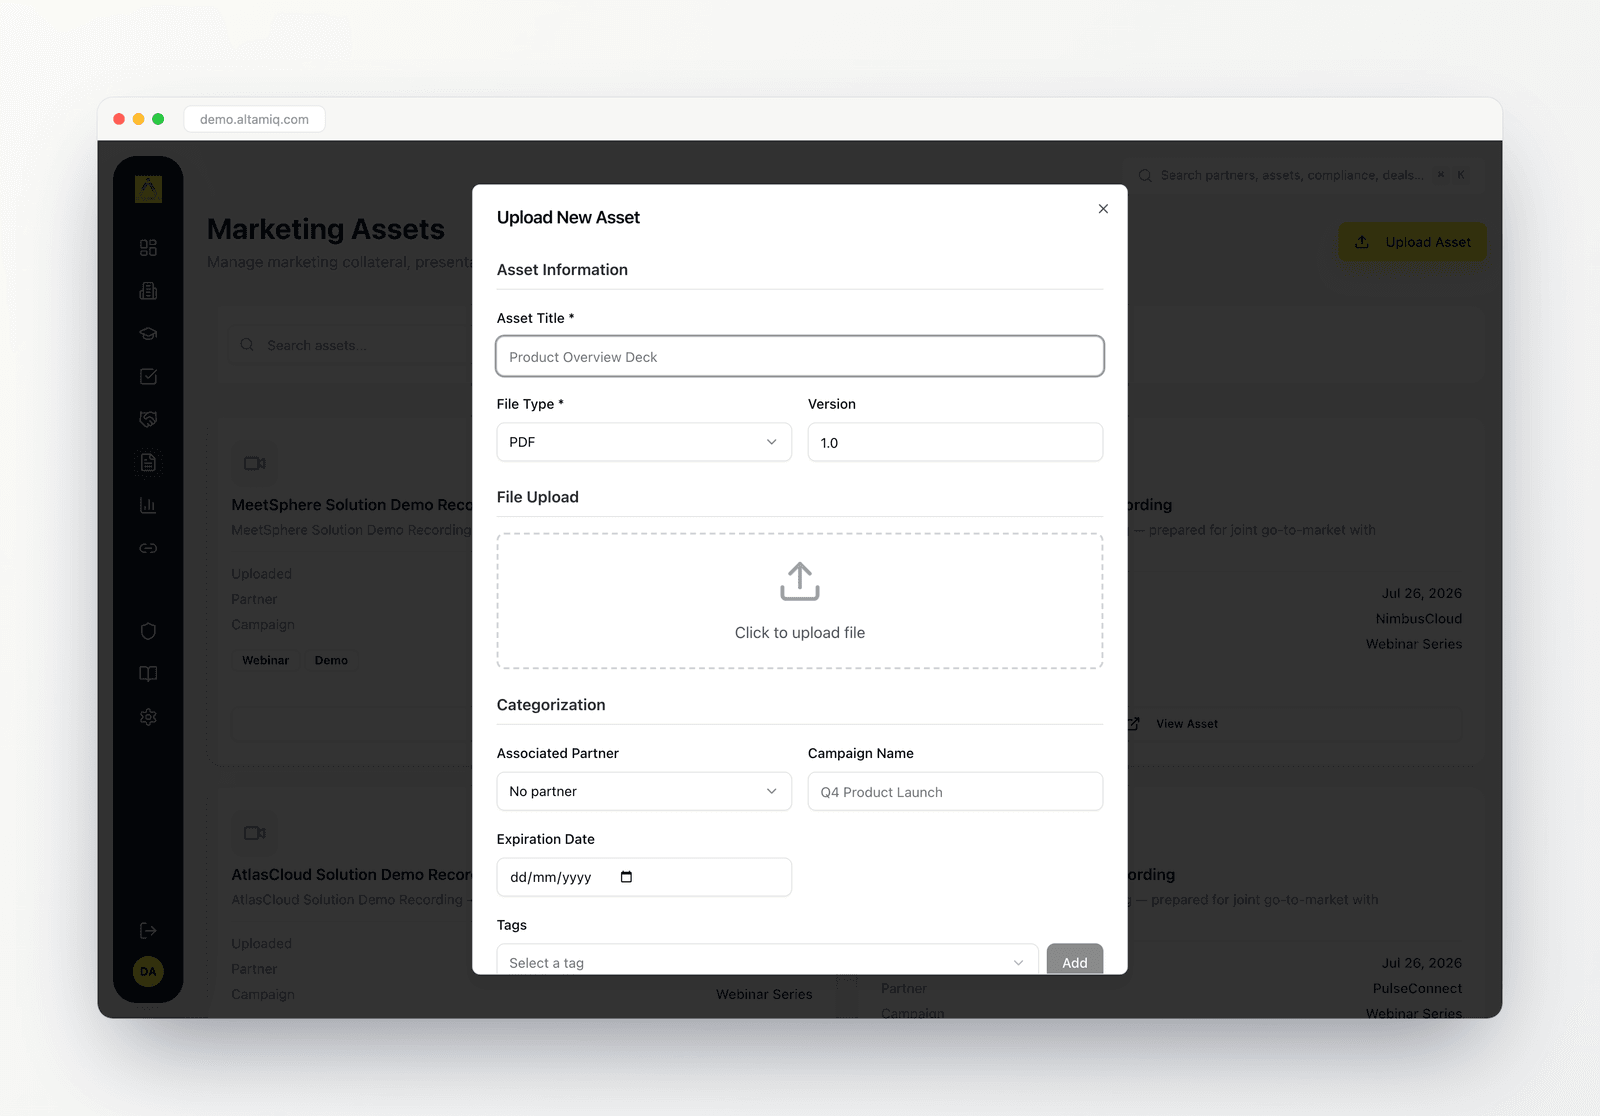 Click **Upload Asset** at the top of the page, or use the **Upload Asset** button shown in the empty state when the library has no assets yet. A dialog titled "Upload New Asset" opens.
Enter an **Asset Title**. This is required, and it's the name your team will see and search by. For example, "Product Overview Deck."
Choose a **File Type**. Your options are PDF, Video, Presentation, Image, Document, Template, and Link. Selecting Link switches the form to expect an external URL instead of a file upload.
Enter a **Version** such as "1.0" if you track document revisions. This field is optional.
For any file type other than Link, click the drop zone to choose a file from your computer. You'll see a live progress bar with the file name and byte count as it uploads, then a green confirmation once it's stored. Files can be up to 98 MB. If you pick something larger, you'll get an instant message asking for a smaller file, and nothing is uploaded. If you chose the Link type instead, paste a full URL that starts with `http://` or `https://` into the URL field.
Link the asset to a partner using the **Associated Partner** picker, add a **Campaign Name**, set an **Expiration Date**, apply one or more **Tags**, and write a short **Description**. All of these are optional, but they make the asset far easier to find later.
Click **Save Asset**. The button stays disabled until you've entered a title and either uploaded a file or entered a valid link, so you can't submit an incomplete asset. Your new asset appears in the library right away.
Uploaded a file by mistake? In the upload dialog, click **Remove** on the green confirmation row to clear it and pick a different file before saving.
### Files versus links
The library handles two kinds of assets. Regular uploads (PDF, Video, Presentation, Image, Document, Template) are stored files that your team can view and download. The **Link** type stores an external URL instead, which is ideal for resources that can't be downloaded, such as a page inside a partner portal. Link assets open directly when viewed and don't show a Download option.
## Search, filter, and find assets
A single filter bar sits below the title, giving you four ways to narrow the library. You can combine them freely.
Type in the "Search assets..." box to match assets by their title. Results update shortly after you stop typing, and the search runs across your entire library, not just the assets currently visible.
Use the type dropdown to show only one file type: PDF, Video, Presentation, Image, Document, Template, or Link. Choose "All Types" to clear it.
Use the searchable partner picker to show only assets linked to a specific partner. Start typing a partner name to jump to it quickly, or choose "All Partners" to clear it.
Use the tag dropdown to show only assets carrying a chosen tag. The available tags are Sales, Marketing, Training, Product, Case Study, Webinar, Demo, Brochure, and Datasheet.
If your filters narrow the library down to nothing, you'll see a "No matching assets" message with a **Clear all filters** button so you can reset everything in one click and start over.
## View, download, edit, and delete
Each asset card has a three-dot menu in its top corner with the actions available to you.
Choose **View Asset** from the menu, click the "View Asset" button at the bottom of the card, or click the asset's title. The asset opens in a new browser tab. For link-type assets, this appears as **Open Link** and takes you straight to the external URL.
For any stored file, choose **Download** from the three-dot menu to save a copy to your computer. Link-type assets don't offer a Download option, since they point to an external page rather than a downloadable file.
Admins and Managers can choose **Edit** to reopen the asset in the same dialog used for uploading, now titled "Edit Marketing Asset." You can update the title, file type, version, categorization, tags, and description, or replace the underlying file or link. Click **Update Asset** to save your changes.
Only Admins see the **Delete** action. Choosing it opens a confirmation dialog that names the asset being removed and warns that the action cannot be undone. Click **Delete** to confirm, or **Cancel** to keep the asset. Managers and Viewers won't see this option.
## Expiration dates
When you set an **Expiration Date** on an asset, the library keeps it visible but flags it once that date has passed. Expired assets appear slightly dimmed in the grid and carry a red "Expired" note with the date they lapsed, so your team can spot outdated collateral at a glance and knows to reach for a newer version. Assets without an expiration date never expire and are always shown at full strength.
Set expiration dates on time-sensitive material like campaign one-pagers or dated pricing sheets. That way the whole team gets a clear visual warning the moment the content is out of date, rather than sharing something stale by accident.
## A note on partner assets and download stats
The library on this page is your shared, company-wide collection. Assets can also live directly on an individual partner's profile, where they're organized by source (Internal, External, or Co-branded). Those partner-specific assets are managed from the partner's own Assets area rather than here. Download activity across your assets is summarized separately on the Analytics page, where you can see totals such as your most downloaded assets.
This documentation is built and hosted on [Mintlify](https://mintlify.com), a developer documentation platform.
Click **Upload Asset** at the top of the page, or use the **Upload Asset** button shown in the empty state when the library has no assets yet. A dialog titled "Upload New Asset" opens.
Enter an **Asset Title**. This is required, and it's the name your team will see and search by. For example, "Product Overview Deck."
Choose a **File Type**. Your options are PDF, Video, Presentation, Image, Document, Template, and Link. Selecting Link switches the form to expect an external URL instead of a file upload.
Enter a **Version** such as "1.0" if you track document revisions. This field is optional.
For any file type other than Link, click the drop zone to choose a file from your computer. You'll see a live progress bar with the file name and byte count as it uploads, then a green confirmation once it's stored. Files can be up to 98 MB. If you pick something larger, you'll get an instant message asking for a smaller file, and nothing is uploaded. If you chose the Link type instead, paste a full URL that starts with `http://` or `https://` into the URL field.
Link the asset to a partner using the **Associated Partner** picker, add a **Campaign Name**, set an **Expiration Date**, apply one or more **Tags**, and write a short **Description**. All of these are optional, but they make the asset far easier to find later.
Click **Save Asset**. The button stays disabled until you've entered a title and either uploaded a file or entered a valid link, so you can't submit an incomplete asset. Your new asset appears in the library right away.
Uploaded a file by mistake? In the upload dialog, click **Remove** on the green confirmation row to clear it and pick a different file before saving.
### Files versus links
The library handles two kinds of assets. Regular uploads (PDF, Video, Presentation, Image, Document, Template) are stored files that your team can view and download. The **Link** type stores an external URL instead, which is ideal for resources that can't be downloaded, such as a page inside a partner portal. Link assets open directly when viewed and don't show a Download option.
## Search, filter, and find assets
A single filter bar sits below the title, giving you four ways to narrow the library. You can combine them freely.
Type in the "Search assets..." box to match assets by their title. Results update shortly after you stop typing, and the search runs across your entire library, not just the assets currently visible.
Use the type dropdown to show only one file type: PDF, Video, Presentation, Image, Document, Template, or Link. Choose "All Types" to clear it.
Use the searchable partner picker to show only assets linked to a specific partner. Start typing a partner name to jump to it quickly, or choose "All Partners" to clear it.
Use the tag dropdown to show only assets carrying a chosen tag. The available tags are Sales, Marketing, Training, Product, Case Study, Webinar, Demo, Brochure, and Datasheet.
If your filters narrow the library down to nothing, you'll see a "No matching assets" message with a **Clear all filters** button so you can reset everything in one click and start over.
## View, download, edit, and delete
Each asset card has a three-dot menu in its top corner with the actions available to you.
Choose **View Asset** from the menu, click the "View Asset" button at the bottom of the card, or click the asset's title. The asset opens in a new browser tab. For link-type assets, this appears as **Open Link** and takes you straight to the external URL.
For any stored file, choose **Download** from the three-dot menu to save a copy to your computer. Link-type assets don't offer a Download option, since they point to an external page rather than a downloadable file.
Admins and Managers can choose **Edit** to reopen the asset in the same dialog used for uploading, now titled "Edit Marketing Asset." You can update the title, file type, version, categorization, tags, and description, or replace the underlying file or link. Click **Update Asset** to save your changes.
Only Admins see the **Delete** action. Choosing it opens a confirmation dialog that names the asset being removed and warns that the action cannot be undone. Click **Delete** to confirm, or **Cancel** to keep the asset. Managers and Viewers won't see this option.
## Expiration dates
When you set an **Expiration Date** on an asset, the library keeps it visible but flags it once that date has passed. Expired assets appear slightly dimmed in the grid and carry a red "Expired" note with the date they lapsed, so your team can spot outdated collateral at a glance and knows to reach for a newer version. Assets without an expiration date never expire and are always shown at full strength.
Set expiration dates on time-sensitive material like campaign one-pagers or dated pricing sheets. That way the whole team gets a clear visual warning the moment the content is out of date, rather than sharing something stale by accident.
## A note on partner assets and download stats
The library on this page is your shared, company-wide collection. Assets can also live directly on an individual partner's profile, where they're organized by source (Internal, External, or Co-branded). Those partner-specific assets are managed from the partner's own Assets area rather than here. Download activity across your assets is summarized separately on the Analytics page, where you can see totals such as your most downloaded assets.
This documentation is built and hosted on [Mintlify](https://mintlify.com), a developer documentation platform.