> ## Documentation Index
> Fetch the complete documentation index at: https://docs.altamiq.com/llms.txt
> Use this file to discover all available pages before exploring further.
# Compliance
> Track every compliance requirement your partners must meet, watch due dates and risk, and see where attention is needed across your whole partner program.
## What Compliance is for
Compliance is where you keep track of the requirements your partners need to meet to stay in good standing. Each requirement is a single item you monitor, for example a SOC 2 audit or a security review, and it is always tied to a specific partner. From here you can see what is compliant, what is overdue, and what carries the most risk, all in one place.
Open Compliance from the sidebar and you land on a page titled **Compliance Management**. Across the top you get four quick-stat cards that summarize everything at a glance:
Every compliance requirement currently tracked across all partners.
How many of those requirements are marked as Compliant.
Requirements whose due date has passed and that are not yet Compliant.
Requirements you have flagged at the Critical risk level.
## Who can do what
Your role decides what you can do on this page. **Admins** can do everything, including deleting requirements and compliance types. **Managers** can create and edit requirements and manage compliance types, but they cannot delete. **Viewers** get read-only access: they can browse every tab, filter, and open the risk matrix, but they will not see the Add Requirement, Compliance Types, Edit, or Delete controls.
## The four views
The page is organized into four tabs. Each one gives you a different way to look at the same set of requirements.
A rolled-up summary of your compliance health. It shows your **Overall Compliance Rate** as a percentage, plus cards for **Upcoming Deadlines**, **Critical Items**, and **Quick Stats** (overdue count, items due in the next 30 days, partners tracked, and average compliance rate). At the bottom, a **Partner Compliance Breakdown** lists each partner with a progress bar for how compliant they are, sorted so the partners that need the most attention rise to the top.
The full working list of every requirement, with search and filters above it. This is where you add, edit, and (if you are an Admin) delete requirements. See the sections below for details.
A grid that plots risk level against status so you can spot dangerous gaps quickly. See "How to read the risk matrix" below.
A space to export compliance data and generate reports for stakeholders using the **Generate Report** button.
## The Requirements list
The Requirements tab is the heart of the page. Each row is one requirement, and the columns tell you everything important at a glance:
* **Requirement**: the name, with a short description underneath if one was added.
* **Compliance Standards**: badges for any standards attached to the requirement, such as a CMMC level, FedRAMP, SOC 2, ISO 9001, HIPAA, GDPR, ITAR, PCI-DSS, or NIST 800-171. A dash appears when none are set.
* **Type**: the compliance type, for example Security Documentation.
* **Partner**: the partner the requirement belongs to.
* **Status**: a colored badge showing the current state.
* **Due Date**: the deadline. If it has passed and the item is not Compliant, the date turns red and an "Overdue" flag appears.
* **Risk Level**: a colored badge for how risky this item is.
* **Assigned To**: the team member responsible.
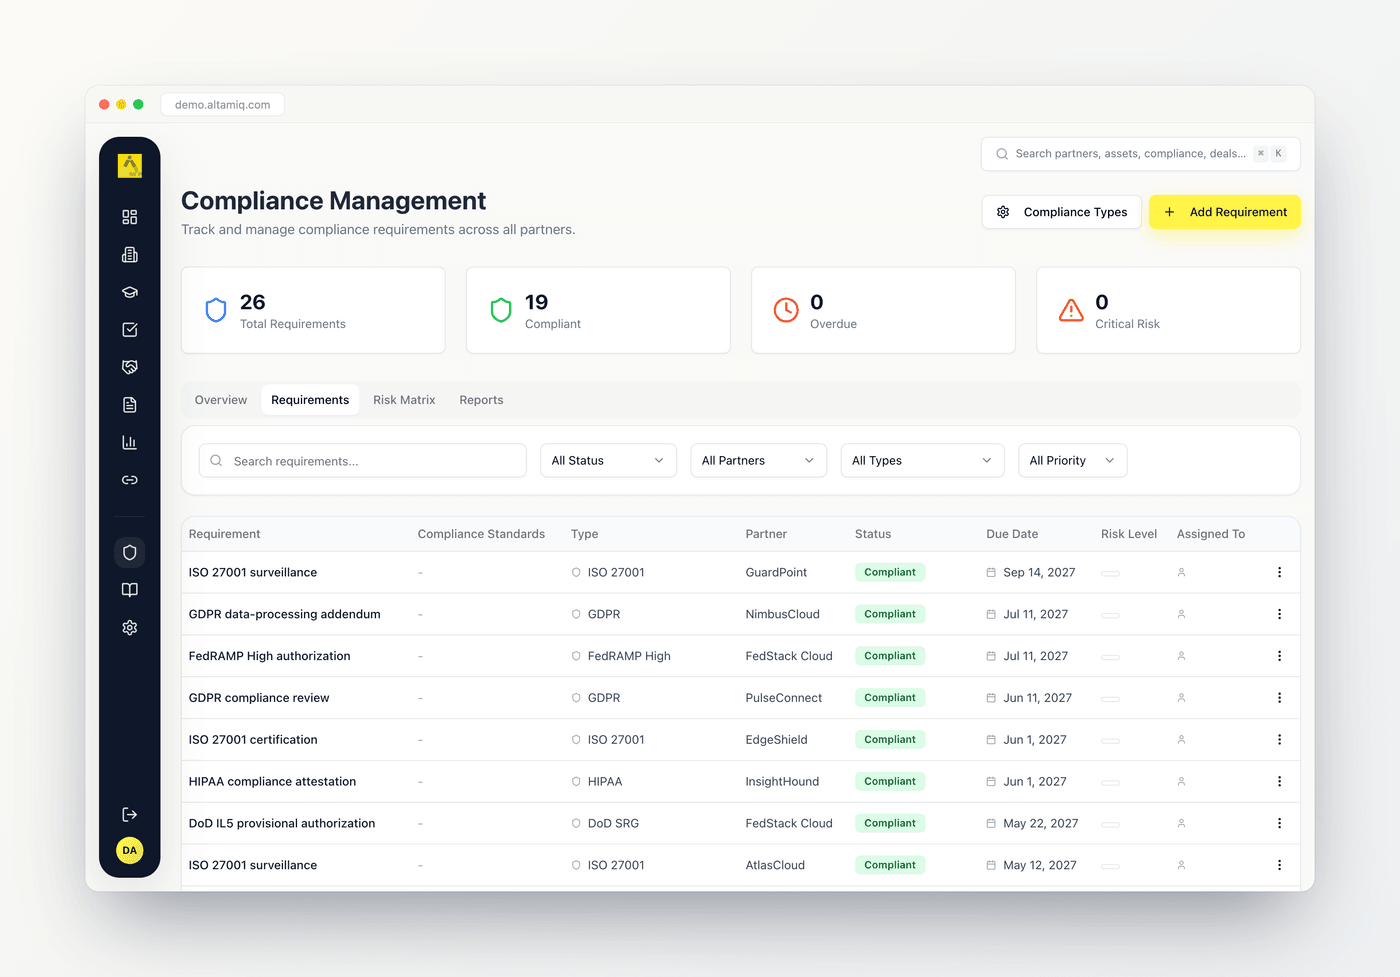 Each row also has a menu (the three-dot icon) at the far right. Depending on your role and the requirement, it offers **View Documentation** (opens the linked document in a new tab), **Edit**, and **Delete**.
Deep links carry you straight to the right place. Arriving from a partner's profile pre-selects that partner in the filter and drops you on the Requirements tab, so you immediately see just their items rather than landing on the Overview.
## Filtering and searching
Above the list you get a search box and four dropdown filters. They stack together, so you can narrow the list as tightly as you like.
* **Search** matches the requirement name, the partner name, or the assigned person.
* **Status** filters to a single status: All Status, Not Started, In Review, Compliant, Non-Compliant, Expired, or Pending Approval.
* **Partner** limits the list to one partner.
* **Type** limits the list to one compliance type.
* **Priority** filters by All Priority, Low, Medium, High, or Critical.
## Status values
A requirement's status tells you where it stands. When you add or edit a requirement you can set it to one of these:
Work on this requirement has not begun yet.
Someone is actively working toward compliance.
The work is done and is being reviewed or verified.
The requirement is met and in good standing. This is the status that counts toward your compliance rate.
The requirement is not being met and needs remediation.
The requirement was met before but has since lapsed and needs renewing.
The status filter on the Requirements tab also includes **Pending Approval**, which older records may carry. When you save a requirement, a Pending Approval status is normalized to **In Review**.
## Priority and risk levels
Both **priority** and **risk level** use the same four-step scale: **Low**, **Medium**, **High**, and **Critical**. Priority is how urgently the requirement needs attention, while risk level is how much damage a lapse would cause. They are set independently, so an item can be high priority but low risk, or the reverse. Critical risk items are counted in the header stat and called out on the Overview tab.
## Adding and editing a requirement
If you are an Admin or Manager, you will see an **Add Requirement** button in the top right. Click it to open the form, or choose **Edit** from a row's menu to change an existing one.
Give the requirement a **name**, choose the **partner** it belongs to, and pick a **compliance type**. Add a description if it helps others understand the requirement.
Choose the **status**, **priority**, and **risk level**, then enter who it is **assigned to**, the **due date**, and an optional **next review date**.
Mark any standards that apply. Pick a **CMMC Compliance Level** (Not Required, or Level 1 through 5) and a **SOC 2 Compliance** option (Not Applicable, SOC 2 Type I, or SOC 2 Type II), and tick the checkboxes for **FedRAMP Authorized**, **ISO 9001 Certified**, **HIPAA Compliant**, **GDPR Compliant**, **ITAR Compliant**, **PCI-DSS Compliant**, and **NIST 800-171 Compliant**. Each one you set shows up as a badge in the Compliance Standards column.
Optionally add a **documentation URL**, describe the **business impact** of non-compliance, list the **remediation steps** to reach compliance, and record any **internal notes**.
Choose **Create Requirement** for a new item or **Update Requirement** when editing. Your change appears in the list right away.
The **Remediation Steps** field is where you write out the plan to close the gap, so anyone picking up the item knows exactly what to do. Pair it with **Business Impact** to make the case for why the work matters.
## Deleting a requirement
Only **Admins** can delete. Open the row menu and choose **Delete**. You will be asked to confirm before the requirement is removed for good. Managers and Viewers will not see this option.
## Compliance types
Compliance types are the categories you sort requirements into, such as Security Documentation. Admins and Managers can manage them through the **Compliance Types** button in the top right.
Click **Compliance Types** to open the manager dialog, which lists every type you have defined.
Choose **Add Compliance Type** to create one, or **Edit** on an existing type. Each type has a **name** and an optional **description**.
Only Admins can remove a type, using the trash icon. You will be asked to confirm first.
Any type you create becomes available in the Type filter and in the compliance type dropdown when adding or editing a requirement.
## How to read the risk matrix
The **Risk Matrix** tab lays your requirements out in a grid so you can see, at a glance, where risk and status collide. The rows are the four **risk levels**, from Low at the top to Critical at the bottom. The columns are five **statuses**: Compliant, In Review, Not Started, Non-Compliant, and Expired.
Each cell shows a **count** of how many requirements fall into that combination of risk and status, along with the names of the first couple of items and a "+N more" note when there are others. Reading it is simple: the healthy corner is the top-left, where low-risk items are already compliant. The corner that demands attention is the bottom-right, where high and critical risk items are still Not Started, Non-Compliant, or Expired.
Each row also has a menu (the three-dot icon) at the far right. Depending on your role and the requirement, it offers **View Documentation** (opens the linked document in a new tab), **Edit**, and **Delete**.
Deep links carry you straight to the right place. Arriving from a partner's profile pre-selects that partner in the filter and drops you on the Requirements tab, so you immediately see just their items rather than landing on the Overview.
## Filtering and searching
Above the list you get a search box and four dropdown filters. They stack together, so you can narrow the list as tightly as you like.
* **Search** matches the requirement name, the partner name, or the assigned person.
* **Status** filters to a single status: All Status, Not Started, In Review, Compliant, Non-Compliant, Expired, or Pending Approval.
* **Partner** limits the list to one partner.
* **Type** limits the list to one compliance type.
* **Priority** filters by All Priority, Low, Medium, High, or Critical.
## Status values
A requirement's status tells you where it stands. When you add or edit a requirement you can set it to one of these:
Work on this requirement has not begun yet.
Someone is actively working toward compliance.
The work is done and is being reviewed or verified.
The requirement is met and in good standing. This is the status that counts toward your compliance rate.
The requirement is not being met and needs remediation.
The requirement was met before but has since lapsed and needs renewing.
The status filter on the Requirements tab also includes **Pending Approval**, which older records may carry. When you save a requirement, a Pending Approval status is normalized to **In Review**.
## Priority and risk levels
Both **priority** and **risk level** use the same four-step scale: **Low**, **Medium**, **High**, and **Critical**. Priority is how urgently the requirement needs attention, while risk level is how much damage a lapse would cause. They are set independently, so an item can be high priority but low risk, or the reverse. Critical risk items are counted in the header stat and called out on the Overview tab.
## Adding and editing a requirement
If you are an Admin or Manager, you will see an **Add Requirement** button in the top right. Click it to open the form, or choose **Edit** from a row's menu to change an existing one.
Give the requirement a **name**, choose the **partner** it belongs to, and pick a **compliance type**. Add a description if it helps others understand the requirement.
Choose the **status**, **priority**, and **risk level**, then enter who it is **assigned to**, the **due date**, and an optional **next review date**.
Mark any standards that apply. Pick a **CMMC Compliance Level** (Not Required, or Level 1 through 5) and a **SOC 2 Compliance** option (Not Applicable, SOC 2 Type I, or SOC 2 Type II), and tick the checkboxes for **FedRAMP Authorized**, **ISO 9001 Certified**, **HIPAA Compliant**, **GDPR Compliant**, **ITAR Compliant**, **PCI-DSS Compliant**, and **NIST 800-171 Compliant**. Each one you set shows up as a badge in the Compliance Standards column.
Optionally add a **documentation URL**, describe the **business impact** of non-compliance, list the **remediation steps** to reach compliance, and record any **internal notes**.
Choose **Create Requirement** for a new item or **Update Requirement** when editing. Your change appears in the list right away.
The **Remediation Steps** field is where you write out the plan to close the gap, so anyone picking up the item knows exactly what to do. Pair it with **Business Impact** to make the case for why the work matters.
## Deleting a requirement
Only **Admins** can delete. Open the row menu and choose **Delete**. You will be asked to confirm before the requirement is removed for good. Managers and Viewers will not see this option.
## Compliance types
Compliance types are the categories you sort requirements into, such as Security Documentation. Admins and Managers can manage them through the **Compliance Types** button in the top right.
Click **Compliance Types** to open the manager dialog, which lists every type you have defined.
Choose **Add Compliance Type** to create one, or **Edit** on an existing type. Each type has a **name** and an optional **description**.
Only Admins can remove a type, using the trash icon. You will be asked to confirm first.
Any type you create becomes available in the Type filter and in the compliance type dropdown when adding or editing a requirement.
## How to read the risk matrix
The **Risk Matrix** tab lays your requirements out in a grid so you can see, at a glance, where risk and status collide. The rows are the four **risk levels**, from Low at the top to Critical at the bottom. The columns are five **statuses**: Compliant, In Review, Not Started, Non-Compliant, and Expired.
Each cell shows a **count** of how many requirements fall into that combination of risk and status, along with the names of the first couple of items and a "+N more" note when there are others. Reading it is simple: the healthy corner is the top-left, where low-risk items are already compliant. The corner that demands attention is the bottom-right, where high and critical risk items are still Not Started, Non-Compliant, or Expired.
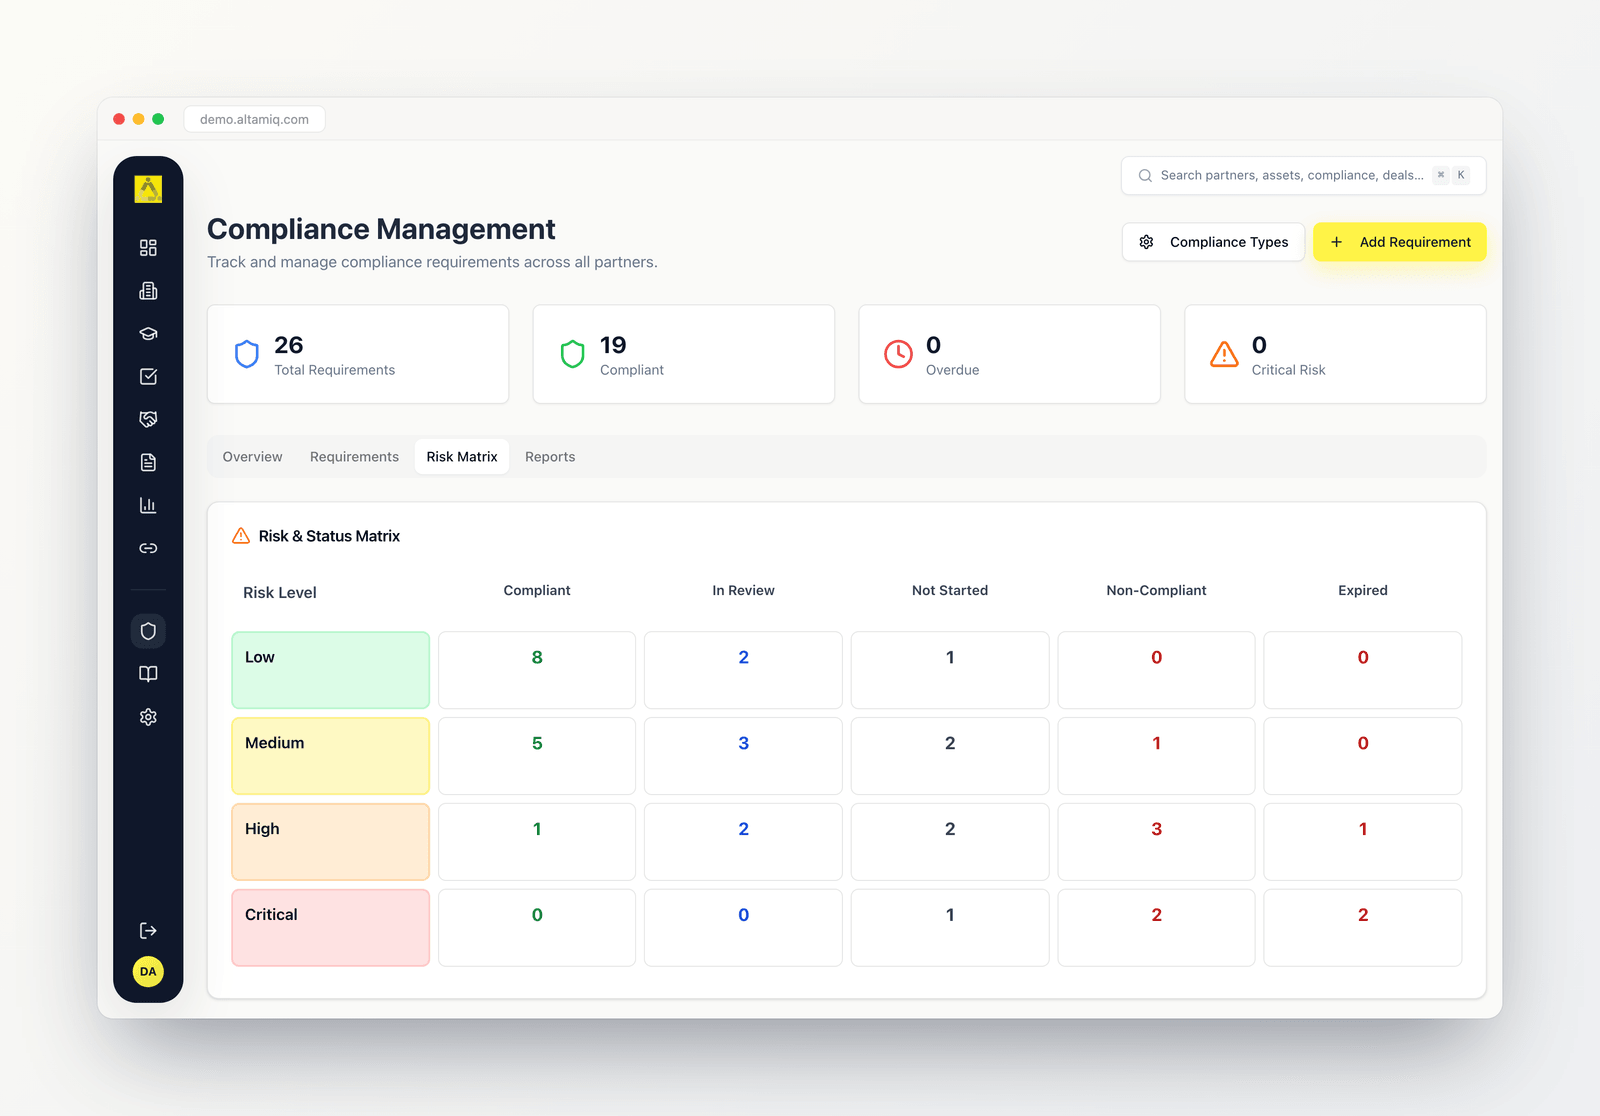 Below the grid you get four **risk summary cards**, one per risk level. Each shows the total number of items at that level, and if any of them are Non-Compliant, Expired, or Not Started, a **Need Attention** badge tells you how many.
Scan the Critical row first. Any number sitting in its Non-Compliant, Expired, or Not Started column is the highest-priority work in your program and is the fastest way to decide what to tackle next.
This documentation is built and hosted on [Mintlify](https://mintlify.com), a developer documentation platform.
Below the grid you get four **risk summary cards**, one per risk level. Each shows the total number of items at that level, and if any of them are Non-Compliant, Expired, or Not Started, a **Need Attention** badge tells you how many.
Scan the Critical row first. Any number sitting in its Non-Compliant, Expired, or Not Started column is the highest-priority work in your program and is the fastest way to decide what to tackle next.
This documentation is built and hosted on [Mintlify](https://mintlify.com), a developer documentation platform.