> ## Documentation Index
> Fetch the complete documentation index at: https://docs.altamiq.com/llms.txt
> Use this file to discover all available pages before exploring further.
# Certifications
> Track your partner employees' certifications and training in AltamIQ: search and filter by partner and status, assign a certification to an employee, upload proof files, and keep every record current.
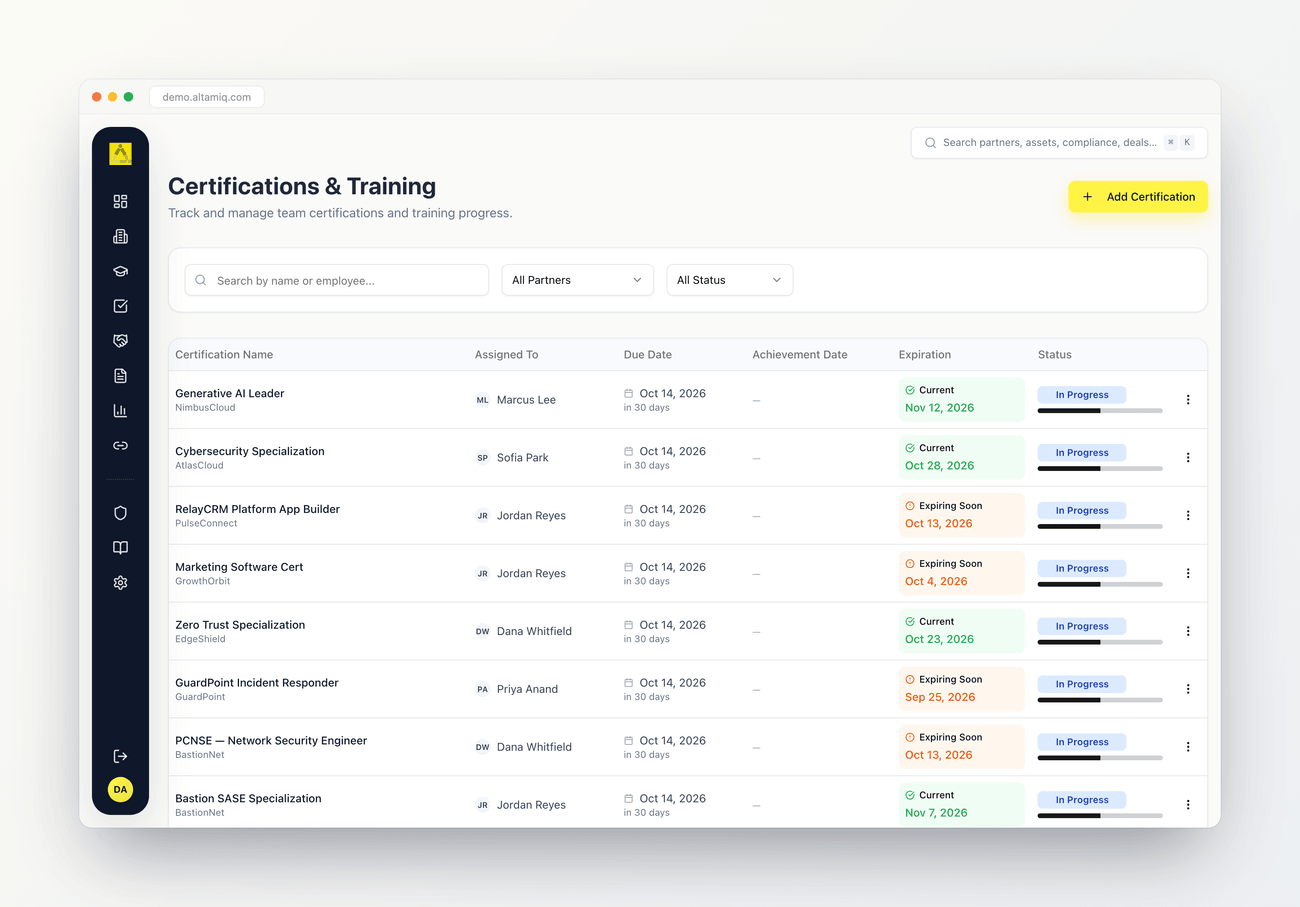
The Certifications page is where you track certifications and training for the people who work at your partners. Each record ties a certification to a specific employee and partner, carries key dates, shows a status, and can hold proof files so you always know who is qualified, who is in progress, and what is coming due. The page is titled **Certifications & Training** in the app.
 ## What you can see at a glance
Every certification appears as a row in the table, so you can scan your whole program in one view. Each row shows:
The name of the certification, with the partner shown just beneath it. If proof files are attached, a small star badge with a count sits next to the name, and you can click it to open any proof file.
The employee the certification belongs to, shown with their initials so you can spot people quickly.
When the certification is due, plus a friendly "in 3 months" style note. If it is past due and not yet completed, the date turns red and shows "Overdue".
The date the certification was achieved, once it has been earned.
The expiration date, color coded so you can tell at a glance whether it is Current, Expiring Soon (within 30 days), or Expired. Rows with no expiration simply show "No expiration".
A colored status badge with a small progress bar underneath, so the stage of each certification is obvious.
## Status values
Every certification carries one of four statuses. You choose the status when you record or edit a certification, and it drives the badge and progress bar in the table.
| Status | What it means |
| - | - |
| Not Started | The certification has been assigned but work has not begun. |
| In Progress | The employee is actively working toward the certification. |
| Completed | The certification has been earned. |
| Expired | The certification is no longer valid and needs to be renewed. |
The Expiration column and the Status field are separate. Expiration is calculated from the expiration date you enter (Current, Expiring Soon, or Expired), while Status is the value you set on the record. A certification can be marked Completed and still show "Expiring Soon" in the Expiration column as its renewal date approaches.
## Searching and filtering
The filter bar at the top of the page helps you narrow a long list down to exactly what you need. You can combine all three controls at once.
Type in the search box to match by certification name or by the assigned employee's name. Results update as you type.
Use the partner dropdown to show only certifications for one partner, or leave it on "All Partners".
Use the status dropdown to show only Not Started, In Progress, Completed, or Expired records, or "All Status".
If you arrive on this page from a partner's profile, the partner filter may already be set to that partner, so you land straight on their certifications. Just switch it back to "All Partners" whenever you want to see everything again.
## Record a certification
Recording a certification connects a certification definition to an employee at one of your partners. You need to be an Admin or a Manager to add one.
Click **Add Certification** in the top right of the page. A dialog titled **Add New Certification** opens.
In the **Certification** dropdown, pick from your existing certification definitions. If the one you need is not listed, choose **+ Add new certification…** and type the name in the field that appears.
Select the **Partner / Vendor** the certification belongs to from the dropdown.
In the **Assigned Employee** dropdown, choose the employee. If they are not in the list yet, choose **+ Add new employee…** and type their name.
Enter the **Due Date**. Optionally add an **Achievement Date** once earned and an **Expiration Date** if the certification expires.
Choose a **Status** (Not Started, In Progress, Completed, or Expired) and a **Priority** (Low, Medium, High, or Critical). Both default to sensible values if you leave them alone.
You can include a **Training Materials URL** and **Notes** to give the record more context.
Use the **Proof Files** section to upload supporting documents. See below for details.
Click **Save**. The new certification appears in the table right away.
The Certification, Partner / Vendor, Assigned Employee, and Due Date fields are marked as required with an asterisk. The other fields are optional and can be filled in later by editing the record.
## Uploading proof
Proof files let you keep certificates, transcripts, screenshots, or short videos attached to the record, so the evidence lives right next to the certification it supports. You add proofs from within the certification form.
Inside the certification form, scroll to the **Proof Files** section near the bottom.
Click **Add Proof File** and pick a file from your computer. Supported types include PDF, Word and PowerPoint documents, images (JPG, PNG, GIF, WebP), and video (MP4, MOV, AVI, WebM). Each file can be up to 50 MB.
A progress bar shows the upload, then briefly reads "Storing…" and confirms with a green "uploaded" note. Newly added files show as "staged" until you save.
Click **Save** on the form. Your staged proofs are attached to the certification at that point.
Once a certification has proof files, a star badge with the file count appears next to its name in the table. Click the badge to open any of the attached files without leaving the page. Inside the form you can also click **View** on any saved proof to open it.
If a file is larger than 50 MB, AltamIQ asks you to choose a smaller one before the upload starts. If a certification saves but a proof file fails to attach, you will see a message letting you know, and you can reopen the certification to retry the upload.
## Editing and deleting
To change a certification, open the row's actions menu (the three-dot icon at the end of the row) and choose **Edit**. The same form opens with the record's details filled in, so you can update dates, status, priority, notes, or proof files.
Deleting is also done from the actions menu, and AltamIQ asks you to confirm before removing a record.
Removing a proof file from a certification only removes the link to it. The original file stays in storage.
## Who can do what
Your role decides which actions are available on this page. A checkmark means the role can do that action, and a blank cell means it cannot.
| Action | Admin | Manager | Viewer |
| - | :-: | :-: | :-: |
| View and search certifications | ✓ | ✓ | ✓ |
| Filter by partner and status | ✓ | ✓ | ✓ |
| Open and view attached proof files | ✓ | ✓ | ✓ |
| Add a certification | ✓ | ✓ | |
| Edit a certification | ✓ | ✓ | |
| Upload proof files | ✓ | ✓ | |
| Delete a certification | ✓ | | |
Admins can do everything on this page, including deleting certifications. Managers can create and edit certifications and upload proof, but they cannot delete records. Viewers have read-only access: they can browse, search, filter, and open proof files, but the Add and Edit options are not shown to them.
This documentation is built and hosted on [Mintlify](https://mintlify.com), a developer documentation platform.
## What you can see at a glance
Every certification appears as a row in the table, so you can scan your whole program in one view. Each row shows:
The name of the certification, with the partner shown just beneath it. If proof files are attached, a small star badge with a count sits next to the name, and you can click it to open any proof file.
The employee the certification belongs to, shown with their initials so you can spot people quickly.
When the certification is due, plus a friendly "in 3 months" style note. If it is past due and not yet completed, the date turns red and shows "Overdue".
The date the certification was achieved, once it has been earned.
The expiration date, color coded so you can tell at a glance whether it is Current, Expiring Soon (within 30 days), or Expired. Rows with no expiration simply show "No expiration".
A colored status badge with a small progress bar underneath, so the stage of each certification is obvious.
## Status values
Every certification carries one of four statuses. You choose the status when you record or edit a certification, and it drives the badge and progress bar in the table.
| Status | What it means |
| - | - |
| Not Started | The certification has been assigned but work has not begun. |
| In Progress | The employee is actively working toward the certification. |
| Completed | The certification has been earned. |
| Expired | The certification is no longer valid and needs to be renewed. |
The Expiration column and the Status field are separate. Expiration is calculated from the expiration date you enter (Current, Expiring Soon, or Expired), while Status is the value you set on the record. A certification can be marked Completed and still show "Expiring Soon" in the Expiration column as its renewal date approaches.
## Searching and filtering
The filter bar at the top of the page helps you narrow a long list down to exactly what you need. You can combine all three controls at once.
Type in the search box to match by certification name or by the assigned employee's name. Results update as you type.
Use the partner dropdown to show only certifications for one partner, or leave it on "All Partners".
Use the status dropdown to show only Not Started, In Progress, Completed, or Expired records, or "All Status".
If you arrive on this page from a partner's profile, the partner filter may already be set to that partner, so you land straight on their certifications. Just switch it back to "All Partners" whenever you want to see everything again.
## Record a certification
Recording a certification connects a certification definition to an employee at one of your partners. You need to be an Admin or a Manager to add one.
Click **Add Certification** in the top right of the page. A dialog titled **Add New Certification** opens.
In the **Certification** dropdown, pick from your existing certification definitions. If the one you need is not listed, choose **+ Add new certification…** and type the name in the field that appears.
Select the **Partner / Vendor** the certification belongs to from the dropdown.
In the **Assigned Employee** dropdown, choose the employee. If they are not in the list yet, choose **+ Add new employee…** and type their name.
Enter the **Due Date**. Optionally add an **Achievement Date** once earned and an **Expiration Date** if the certification expires.
Choose a **Status** (Not Started, In Progress, Completed, or Expired) and a **Priority** (Low, Medium, High, or Critical). Both default to sensible values if you leave them alone.
You can include a **Training Materials URL** and **Notes** to give the record more context.
Use the **Proof Files** section to upload supporting documents. See below for details.
Click **Save**. The new certification appears in the table right away.
The Certification, Partner / Vendor, Assigned Employee, and Due Date fields are marked as required with an asterisk. The other fields are optional and can be filled in later by editing the record.
## Uploading proof
Proof files let you keep certificates, transcripts, screenshots, or short videos attached to the record, so the evidence lives right next to the certification it supports. You add proofs from within the certification form.
Inside the certification form, scroll to the **Proof Files** section near the bottom.
Click **Add Proof File** and pick a file from your computer. Supported types include PDF, Word and PowerPoint documents, images (JPG, PNG, GIF, WebP), and video (MP4, MOV, AVI, WebM). Each file can be up to 50 MB.
A progress bar shows the upload, then briefly reads "Storing…" and confirms with a green "uploaded" note. Newly added files show as "staged" until you save.
Click **Save** on the form. Your staged proofs are attached to the certification at that point.
Once a certification has proof files, a star badge with the file count appears next to its name in the table. Click the badge to open any of the attached files without leaving the page. Inside the form you can also click **View** on any saved proof to open it.
If a file is larger than 50 MB, AltamIQ asks you to choose a smaller one before the upload starts. If a certification saves but a proof file fails to attach, you will see a message letting you know, and you can reopen the certification to retry the upload.
## Editing and deleting
To change a certification, open the row's actions menu (the three-dot icon at the end of the row) and choose **Edit**. The same form opens with the record's details filled in, so you can update dates, status, priority, notes, or proof files.
Deleting is also done from the actions menu, and AltamIQ asks you to confirm before removing a record.
Removing a proof file from a certification only removes the link to it. The original file stays in storage.
## Who can do what
Your role decides which actions are available on this page. A checkmark means the role can do that action, and a blank cell means it cannot.
| Action | Admin | Manager | Viewer |
| - | :-: | :-: | :-: |
| View and search certifications | ✓ | ✓ | ✓ |
| Filter by partner and status | ✓ | ✓ | ✓ |
| Open and view attached proof files | ✓ | ✓ | ✓ |
| Add a certification | ✓ | ✓ | |
| Edit a certification | ✓ | ✓ | |
| Upload proof files | ✓ | ✓ | |
| Delete a certification | ✓ | | |
Admins can do everything on this page, including deleting certifications. Managers can create and edit certifications and upload proof, but they cannot delete records. Viewers have read-only access: they can browse, search, filter, and open proof files, but the Add and Edit options are not shown to them.
This documentation is built and hosted on [Mintlify](https://mintlify.com), a developer documentation platform.